Micronet creates a default stage for a service job when you first create the job. For simple jobs, this might be the only stage needed. However, bigger and more complex jobs will probably have several stages, e.g. a startup stage, several progress stages and a completion stage. For jobs such as these, you need to create the job stages when you first create the job. This is because Micronet asks you to allocate materials, labour and text to the appropriate stages when you add them to the job. (However, you can change the stage that materials or labour are assigned to if required.)
An example may be an electrical project that is made up of the following job stages:
|
Stage Number |
Description |
Stage Type |
|
D1 |
Main Distribution |
Normal |
|
L1 |
Lighting Level 1 |
Normal |
|
L2 |
Lighting Level 2 |
Normal |
|
L3 |
Lighting Level 3 |
Normal |
|
P1 |
Power Level 1 |
Normal |
|
P2 |
Power Level 2 |
Normal |
|
P3 |
Power Level 3 |
Normal |
|
T1 |
Telephone/Data Cabling |
Normal |
|
V001 |
Provide Temporary Power To Site |
Variation |
|
V002 |
Supply and Fit Extra 20 GPO’s |
Variation |
When a new job is created, Micronet automatically creates an initial stage for the job based on the default setting entered in the Department master file (refer to "Adding a New Department"). For example, this initial stage may be numbered 1. Micronet automatically assigns any contract value entered when the job is created to this initial stage.
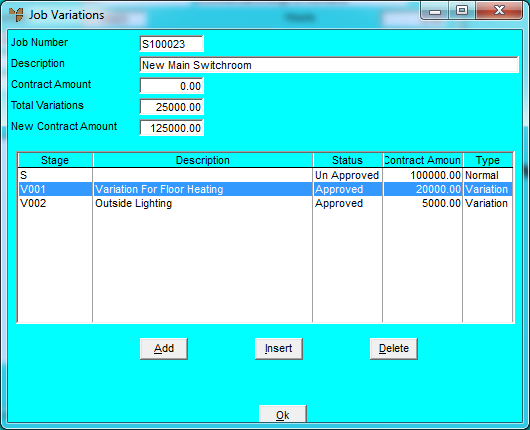
You can create additional normal and/or variation stages for a job at any time. You create variation stages when there is additional work to complete that was not included in the original contract amount. The stage type (normal or variation) denotes the way Micronet deals with the stage. For normal stages, costs posted against the stage impact on the original contract amount. For variations, costs accrue against variations to the main contract amount. When a variation stage is created and is flagged as being approved, the value of the variation stage is added to the job header information for total variations and subsequently added to the new job overall contract value. This value is then available to use when you create progress claim invoices.
Creating stages and variations allows you to sub-group job transactions into cost groups for reporting and budgeting purposes. That is, job transaction reports can be printed in stage order if required.
Because each job will have different requirements, you setup the stages and variations individually for each job. However, if you do have a common set of stages for some jobs, Micronet allows you to copy the job stages and variations from one job to another (refer to "Job Transaction Processing - Stages - Load Stages").
To create a new stage or variation for a service job:
Refer to "Managing Service Jobs".
Micronet displays the Job Variations screen.
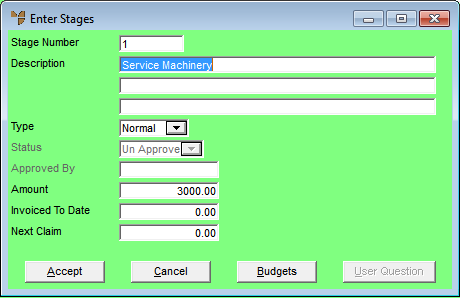
If you selected to add, insert or edit a job stage or variation, Micronet displays the Enter Stages screen.
|
|
Field |
Value |
|
|
Stage Number |
Enter a unique ID for the stage or variation (up to 10 characters). |
|
|
Description |
Enter up to three lines of description for the stage or variation. |
|
|
Type |
Select whether you are creating a Normal job stage or a Variation stage. The stage type determines whether the costs posted against the stage impact on the original contract amount or accrue against variations to the main contract amount. |
|
|
Status |
For variation stages only, leave the status as Unapproved until the stage is approved. When you set the status to Approved, the Amount you enter on this screen is added to the total variations on the job header and the variation amount is available when processing progress claims. |
|
|
Approved By |
For variations only, if you selected Approved in the Status field, enter any reference or the name of the person who is approving the variation. |
|
Amount |
Enter the total dollar value of this stage or variation. Costs posted against this stage or variation will reduce this amount. |
|
|
Invoiced To Date |
Micronet displays any amount already posted against this stage or variation. |
|
|
Next Claim |
If a progress claim has already been posted against this stage, Micronet displays the next claim number. |
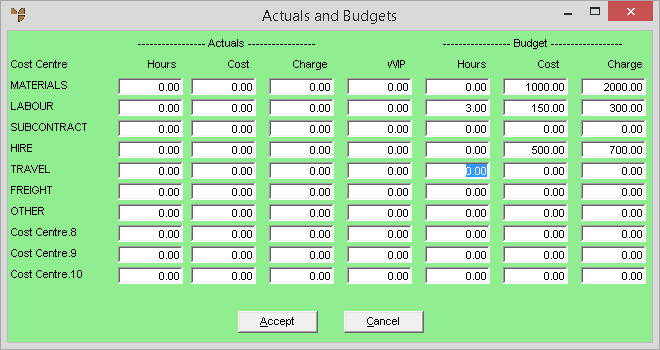
Micronet displays the Actuals and Budgets screen. The Cost fields on this screen are only displayed if your user security allows you to access cost prices (i.e. they are not displayed if the Show Cost on Inquiries field on your user ID is set to No - refer to "Maintenance - Edit UserIDs - 1. Main").
|
|
Field |
Value |
|
|
Actuals |
|
|
|
Hours |
For each cost centre, Micronet displays the actual hours (labour) already posted against this stage or variation. |
|
|
Cost |
For each cost centre, Micronet displays the actual cost of sales (labour and/or materials) already posted against this stage or variation. |
|
|
Charge |
For each cost centre, Micronet displays the actual amount already charged to the customer for this stage or variation. |
|
|
WIP |
For each cost centre, Micronet displays the amount of the Cost already charged to the customer for this stage or variation. This does not have to be the full amount of Work in Progress (WIP); a portion can be held over for future invoices. |
|
Budget |
|
|
|
Hours |
For each cost centre, enter the budgeted hours (labour) for this stage or variation. |
|
|
Cost |
For each cost centre, enter the budgeted costs (labour and/or materials) for this stage or variation. |
|
|
Charge |
For each cost centre, enter the budgeted amount to be charged to the customer for this stage or variation. |
Micronet redisplays the Enter Stages screen.
If you selected to add a stage or variation, Micronet redisplays the Enter Stages screen so you can add further stages or variations.
For more information about using the User Defined Questions screen, refer to "Edit - User Information".
Micronet redisplays the Job Variations screen showing all the stages and variations for the job.
Micronet redisplays the Job Transaction Processing screen.